-
Best Children’s Gifts for Christmas while Traveling

This post may contain affiliate links.
Traveling to visit family, friends, or just a wonderful new location is a great way to spend Christmas. But deciding what to buy, pack, or bring is especially difficult at Christmas. Here are some thoughts on the best children’s gifts for Christmas while traveling as well as some creative ideas about handling the logistics of a Christmas on the road.

#1 Gift Experiences
Even if you aren’t traveling for Christmas, gifting experiences is a great way to build memories as a family and avoid accumulating stuff. One year, an Aunt and Uncle gifted the entire extended family an indoor skydiving flight. During the days following Christmas, we all went as a group and had a great time. Even the small children could participate and we got pictures of everyone in our suits!
The experiences don’t have to be cashed in so quickly though. Here are some more ideas that would be great for children of all ages.
- Theatre tickets
- Could be anything from Broadway-style to a community production.
- Museum, zoo, or aquarium membership
- Museum, zoo, or aquarium special entrance
- Special events, behind-the-scenes tours, animal encounters, etc.
- A semesters worth of classes
- Dance, martial arts, soccer, art, etc.
- A workshop-style class
- Anything that is 1-2 days in length. Cooking, windsurfing, etc.
- Electronic subscription
- Summer camp
- Parent-child date
- Fun restaurant, movie theatre, ice skating, etc.
- Vacation
#2 Gift Subscriptions
There are tons of great subscription services now and they make great gifts whether you are at home or traveling. Arrange to receive the first box and bring it with you. The boxes tend to be smaller and full of consumable projects so you won’t have to carry too much and the kids can enjoy them wherever they are.
- Give the gift of Adventure! with Little Passports. Learn about new countries or states with fun souvenirs and activities.
- Dive into an art project with Kiwi Crate. These would make especially good Christmas-afternoon activities since the kids and parents can work together to complete the activities.
- Magazine Subscription
- National Geographic Kids, Sports Illustrated Kids, Zoobooks, Lego Club Magazine, etc.
- Electronic Subscription
- Audible, Netflix, Apple Music, etc.
#3 Travel-Friendly Gifts
The items in this category are small, not too fragile, multi-purpose, and/or practical. These items can go anywhere and can keep the kids happy in the car, on a plane, or at home.

- Kindle 2. Kid’s Tablet 3. Costume Hoodie 4. Fun and comfy headphones 5. Reusable Activity Books 6. Travel Games
#4 Gifts That Pack Small
Gifts that can be easily folded or disassembled can be taken home in a checked bag or the trunk of the car. If you are staying with family and friends, try having these gifts delivered directly to them so you only have to deal with the logistics of a one-way trip. This is the perfect solution for parents who want to have something big under the tree Christmas morning.
My kids will be getting scooters this year and we’ll be bringing them back in our checked bags.

‘1. Scooter 2. Pop-up Tent 3.Dress up clothes
4. Inflatables
#5 Gifts They’ll Use to Travel
While the travel-friendly gifts are good while traveling or at home, these gifts are just for travel. Choose something specific to your location, like snorkel gear or snow gear, or some fun travel gear they can use for all their trips.

‘1. Luggage Set 2. Travel Pillow 3. Kid’s Sleeping Bag 4. Kid’s Snorkel 5. Kid’s Ski Set
There you have it! I didn’t follow my own advice this year and I have 3 suitcases full of gifts to check on our flight to Texas! Hopefully, after we pass out gifts to our family we’ll have enough room to at least bring the kid’s gifts back.
Merry Christmas!
amzn_assoc_placement = “adunit0”;
amzn_assoc_search_bar = “true”;
amzn_assoc_tracking_id = “magnetsfromev-20”;
amzn_assoc_ad_mode = “manual”;
amzn_assoc_ad_type = “smart”;
amzn_assoc_marketplace = “amazon”;
amzn_assoc_region = “US”;
amzn_assoc_title = “Shop This Post”;
amzn_assoc_linkid = “baf13dc7119d3554b8f4680b08149c28”;
amzn_assoc_asins = “B00OQVZDJM,B01J94SBEY,B01M4HJJMJ,B00HN91AE6”; - Theatre tickets
-
How to Get a Chinese Tourist Visa for the Whole Family

This post may contain affiliate links.
We are headed to China in 2018! We’re especially excited because the children are learning Chinese and my Grandmother is Chinese. It will also be the longest trip we’ve taken with the kids so there is a lot of preparation to do. The most important piece of preparation was to apply for and receive our visas. China does not offer any visa upon arrival so you have to take care of this in advance!
The China Embassy website has instructions but we still ran into some unexpected requirements at the Consulate. This post is everything we learned in the process so your application process can go more smoothly than ours did.
Obviously, the Chinese government can change their requirements at any time. This is not meant to replace the information found on the China Embassy website but is meant to help make it easier to understand. Our experience was with the Chinese Consulate in San Francisco, the process may vary slightly at different Consulates.
Type of Chinese Visa
First, we applied for a Tourist Visa “L”. This is because we are not Chinese passport holders and we only plan to be in China for tourism which will never exceed 60 days.
We chose to apply for a 10-year multiple-entry visa. This is the longest visa option available but it costs the same ($140/person) as a single-entry so you might as well. We hope to visit every year or two to help reinforce the children’s language learning.
Please note, the 10-year visa is not listed as an option on Form V. Check other and fill in “10-year multiple-entry.”

Chinese Visa Application, Form V Supporting Documentation
The following are requirements that were listed online as well as additional documents I was required to produce when I reached the consulate.
- Form V
- Filled in completely and signed.
- Each individual will need this form completed. There is a section to include people who share your passport, but this wouldn’t apply to Americans.
- Daily itinerary as required by Form V section 2.6
- If your trip is longer than 5 days you will need to include your itinerary on a separate piece of paper. I made ours with 3 columns: date, address, itinerary.
- For the itinerary column, I kept it simple with categories like “Travel Day”, “Recovery Day”, “Sightseeing Day.”
- I made copies for each person so there was one copy for every Form V.
- Passport
- You must have 6 months of validity remaining on your passport. They will also keep your passport and it will be 7 days before you can get it back. Make sure you time this to correspond with any other travel you have coming up.
- Black and white photocopy of passport
- I didn’t see this requirement online so I had to make this copies at the consulate. They have copy machines and I recommend you bring quarters (even if you think you have everything) just in case.
- For adults, black and white photocopy of Driver’s License or other Government Issued ID.
- Another requirement I couldn’t find online.
- For children, copy of birth certificate
- Again, not listed online, but required.
- Flight receipt. Must show everyone’s names as well as entry/exit dates.
- This is a big one, you cannot get a visa without flight details.
- We booked nonrefundable tickets and then made sure to start the visa process well in advance in case we got rejected and needed to reapply.
- I have heard of people getting refundable tickets and then canceling and rebooking cheaper tickets once their visa is approved. I’m not sure how the Chinese Embassy feels about this, so I cannot recommend this. If your trip is coming up quickly, it is certainly a way to ensure against a visa rejection.
- Only one copy is required for the family only if all names are listed on the reservation.
- Photos meeting all requirements.
- Walgreens was not able to take pictures that met China’s size requirements. I ended up taking these at home with a tripod and then editing them in Photoshop.
- There is a photo station inside the Consulate. This is a good back up option if your photos get rejected. Just make sure you are not wearing a white shirt.
- Copy of hotel reservations or a letter of intent from your host.
- Per the instructions online, I brought our hotel reservations but they did not end up asking for them.
- Only one copy is required for the family only if all names are listed on the reservation.
- Payment (due on pickup)
- They accept Visa, Mastercard, Certified Check, or Money Order.
The Process
I showed up at the San Francisco Consulate at 1 pm on a Tuesday. The line was out the door and wrapped down the sidewalk. A security guard was handing out numbers so we grabbed ours and left to eat some ice cream.
We returned at 2 pm and waited for an hour before our number was called. Once our number was called we waited in another line for half an hour before speaking to a representative. She reviewed our documentation and informed us of what we were missing. After making some photocopies we got back into a shorter line to speak to the same representative again. This line took quite a while and we finally left at 4 pm.
When she accepted our paperwork she gave me a receipt and instructions to come back 7 days later. The security guard had suggested 2 pm as the best time for pickups.
I waited in line for half an hour to pay for and pick up our visas. There were no mistakes with any of the 4 visas I had applied for.
Although I’m very happy to have received our visa, I am definitely going to make sure to have copies of our itinerary, exits flights, and hotel reservations when we arrive at customs in Beijing. You just never know!
If all of this just sounds like too much, or if you don’t live near an Embassy, you can pay a travel agent or service to submit everything for you. Plan on it taking an extra couple weeks and costing roughly $100/person.
I hope this helps! We can’t wait for our trip to China!
Find hotel reservations in China here!
//cdn0.agoda.net/images/sherpa/js/sherpa_init1_06.min.js
var stg = new Object(); stg.crt=”24009967279739″;stg.version=”1.04″; stg.id=stg.name=”adgshp-561057960″; stg.width=”728px”; stg.height=”90px”;stg.ReferenceKey=”oo1U1GCaj2hvHq+860OpLQ==”; stg.Layout=”WideStatic”; stg.Language=”en-us”;stg.Cid=”1786626″; stg.City=”1569″;stg.OverideConf=false; new AgdSherpa(stg,3).initialize();amzn_assoc_placement = “adunit0”;
amzn_assoc_search_bar = “true”;
amzn_assoc_tracking_id = “magnetsfromev-20”;
amzn_assoc_ad_mode = “manual”;
amzn_assoc_ad_type = “smart”;
amzn_assoc_marketplace = “amazon”;
amzn_assoc_region = “US”;
amzn_assoc_title = “My Amazon Picks”;
amzn_assoc_linkid = “4dcf2fa5da9d711b9a00c8596b43b54a”;
amzn_assoc_asins = “B01BV941FS,B0752XSBH1,B01FWEMMIQ,B01J90MOVY”;//z-na.amazon-adsystem.com/widgets/onejs?MarketPlace=US
- Form V
-
How to Turn Your Flight into a Vacation

This post may contain affiliate links.
This is for all the moms (and dads) out there who occasionally get to/have to fly without their children. I did it wrong for years but I have finally seen the light and consider myself liberated! No more will I tolerate boring flights! No more will I check my watch every half hour! No more will I use my time catching up on boring tasks! No more will I watch movies I’m not interested in because they are available! No more!
That’s a lot of explanation points.
I used to travel for work on a semi-regular basis. These trips usually involved 4-5 hours in airports and on planes to participate in a 2-hour meeting and then catch a flight back. Whenever possible I timed my trips for the minimum time away, which meant that I’d take return flights the same day or at the crack of dawn the next morning. At the time, this worked best for my work and family schedule. It was killer for my sleep schedule and I never got to lounge around a business hotel catching up on my shows, but it was right at the time.
Looking back I’m realizing that the opportunity for relaxation wasn’t in those hotels I never spent enough time in, it was on all those flights! I can cut a hotel stay to a ridiculous number of hours, but no amount of planning on my part is going to reduce the flight time from Raleigh to Detroit.
The solution?
Embrace the flight time!
I recently flew cross country with both kids and thought to myself, “My next flight is solo, it will be like a vacation.” When the time came I prepared for it as if it was a vacation and it was heavenly. Here’s how you can do too!

How to Turn Your Flight into a Vacation
#1 Pack the Right Snacks
You can’t relax when you’re munching on airline pretzels! So bring what you really want. Don’t buy it at the airport because then you’ll feel guilty about paying the inflated price. Make a quick stop at your favorite grocery store and grab the sandwich, wrap, or salad of your choice! I swung through Trader Joe’s and grabbed some shrimp rolls and a salad.
Toss your meal of choice into a small lunch bag with some freezer packs and away you go!

Never settle for airplane food and prices when you don’t have to! #2 Pack the Right Entertainment
You could make the argument that a long flight is a good time to catch up on some education or required reading. Practically speaking, you’re probably right.
BUT I say that a long flight is when you should catch up on some fun reading that makes the time fly by! (Get it?)
Yesterday I finished the Crazy Rich Asians series and loved it. Life is too short to read books that are easy to put down. ?
If you’re slowly working your way through a fun TV show or you’ve been dying to watch some new movie, bring that! Don’t rely on there being something good on the airline’s entertainment.

To me, books only fall into two categories: tedious chore and impossible to put down. With TV I’m far less discerning. #3 Wait in Style
We have had 2 free tickets to the United Premier Lounge hanging on our fridge for a year. They came as a credit card bonus but we always had more than 2 people and never found time to use them. Yesterday I finally remembered to grab them on the way out the door and spent an hour enjoying the free snacks and drinks is a cushy quiet room. I had soup, salad, cheese, and brownie bites and I didn’t even get to take advantage of the complimentary bar but will keep it in mind for next time!
By the time I sauntered up to the gate my group had already been called so I could go straight to the front of the line and just walk onto the plane. I wasn’t even cutting it close, I arrived at exactly the right time!

If you have an airline credit card, you may already be eligible for a few lounge passes every year. #4 Get Comfy
The number of gadgets and gizmos they make for air travel is staggering. Do a quick Amazon Search

If someone comes up with a product that truly revolutionizes comfort in coach, they should go a Nobel Peace Prize! #5 Take Your Zen to the Next Level
I packed a few refreshing face masks to use on the flight to totally maximize my time and relaxation. For something a bit less obvious, try some under eye masks or even a lip mask. I think I’m also going to pick up some teeth whitening strips for the flight home.
The idea is, pick something you don’t have time for at home, or you can never complete without constant interruptions! Here are some more ideas:

I wouldn’t always have felt comfortable wearing a face mask in a public place like a plane, but I’m all the way there now. What do you think? Are you getting more excited about your next solo flight? What else do I need to add to my list?
Oh, and if you’re looking for slightly more practical and functional advise on flying with children? I have that too. ?
amzn_assoc_placement = “adunit0”;
amzn_assoc_search_bar = “true”;
amzn_assoc_tracking_id = “magnetsfromev-20”;
amzn_assoc_ad_mode = “manual”;
amzn_assoc_ad_type = “smart”;
amzn_assoc_marketplace = “amazon”;
amzn_assoc_region = “US”;
amzn_assoc_title = “Shop This Post”;
amzn_assoc_linkid = “0118941c517dfb1c45151778f6cdc80b”;
amzn_assoc_asins = “B01JM709YS,B01N1RTN7X,B0174YMN7W,B074QLCN3D”;//z-na.amazon-adsystem.com/widgets/onejs?MarketPlace=US
-
Children’s Museum of Atlanta

A couple weeks ago I found myself in Atlanta with the kids and 36 hours to kill before our flight. The drive from Athens hadn’t been long, but I was still looking for someplace the kids could burn off some energy before we headed to the hotel. Since it was raining, we chose to check out the Children’s Museum of Atlanta.
Admission was a little outrageous at $15.95 regardless of age but I forked over the cash and we walked inside. We arrived at 1 pm on a Sunday afternoon and almost all of the kids there were with birthday parties. There was no way to tell except that when they would all head to the party room anytime an announcement came over the loudspeaker. When we eventually left around 3:30, everything was much more crowded even though the party crowd has left.

It wasn’t too crowded when we first arrived. It must have been nap time. The kids only had a couple minutes to explore the diner before I whisked them off for storytime. Storytime or some other entertainment option was available every hour throughout the afternoon. The first storytime we went to was the only one we attended. I found the choice of storybook to be quite boring and overly educational. It was Sid the Science Kid teaching why you should wash your hands but without any rhymes or funny happenings.

The diners are always one of the hits at children’s museums. 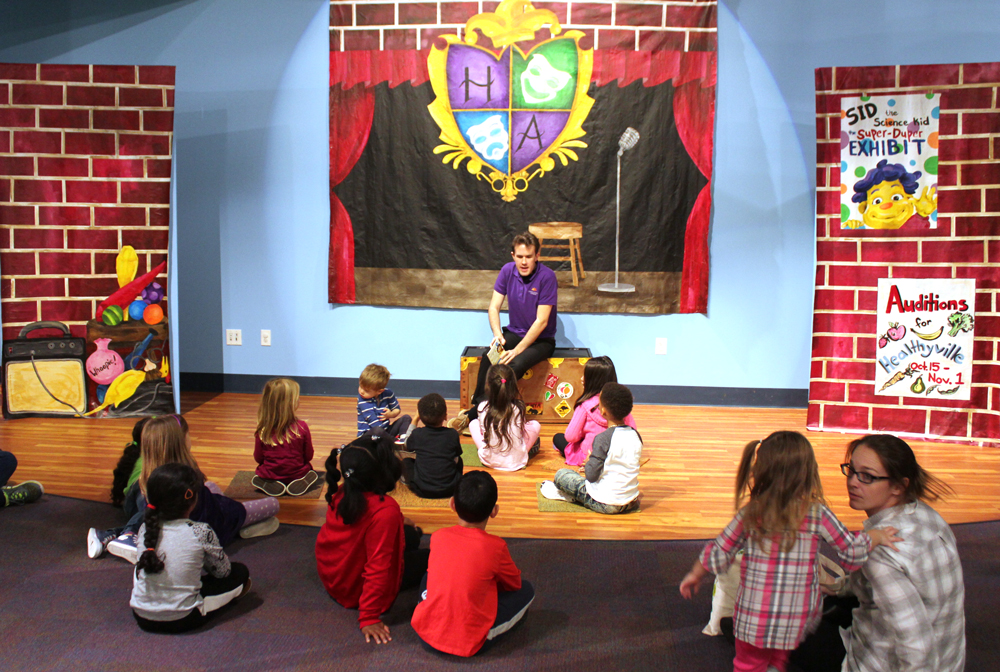
Storytime at the Children’s Museum of Atlanta. Right next to the storytime stage, HJ was captivated by the pulley system next to the treehouse. She would carefully fill the bucket and raise it to the top, ask me to hold the rope, and then climb up to unload.

HJ figuring out the pulley system. While she was pulley-ing to her heart’s content, Killian played on the playground structure and danced along to Sid the Science kid on a giant screen.
The science exhibits in the back were pretty much abandoned, but both my kids loved playing with the toy microscopes, weighing various blocks, and racing blocks down the different friction ramps.

Hard at work in her lab. 
Working together to solve a problem on the screen. Next, we signed up for an art project. There were time slots available every half hour and you just had to pencil your name in and then show up. The children were tasked with making a simple wind direction craft and the supplies were all laid out when we arrived. The whole project took my kids less than 10 minutes and we were the first to leave.
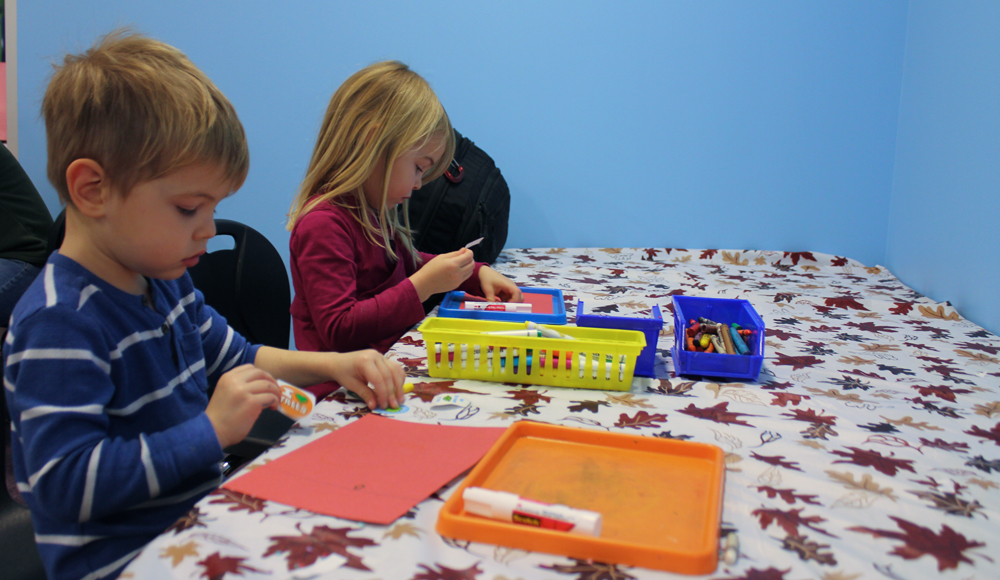
Working on their weather vanes. 
The finished product! At this point, I was getting a bit restless but the kids were still having a blast. We went on to cover: sand play, paint, water play, climbing, and the piano stairs.
Although $45 for the 3 of us was really quite steep, the kids could easily have spent all day here. To really maximize your money, I’d recommend going before lunch and then returning later in the day. They provide hand stamps on the way out so you can re-enter for free on the same day. If you would rather pack a lunch, there is a cafeteria area upstairs. There are a couple vending machines but no cafe so it is strictly self-catered.
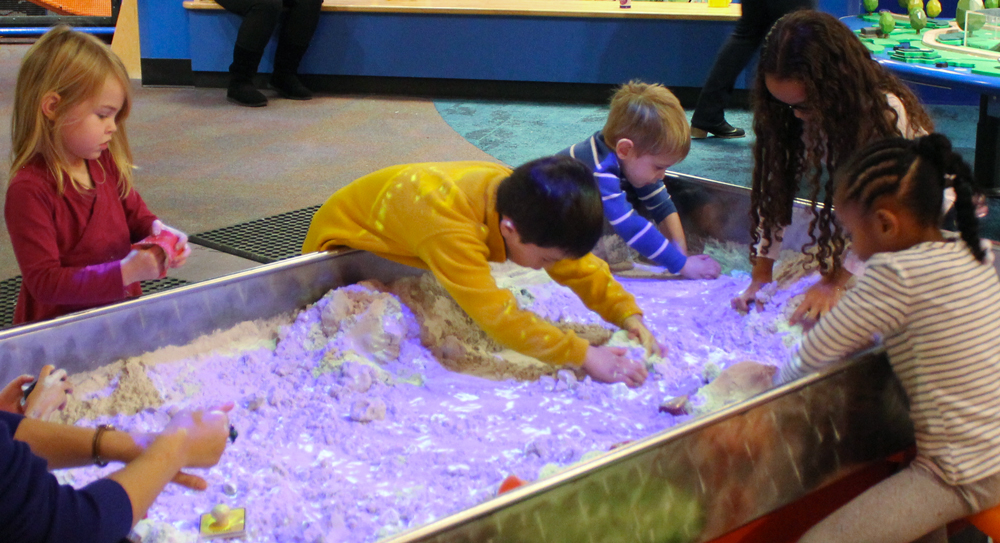
Sand play AND crazy lights? So fun! 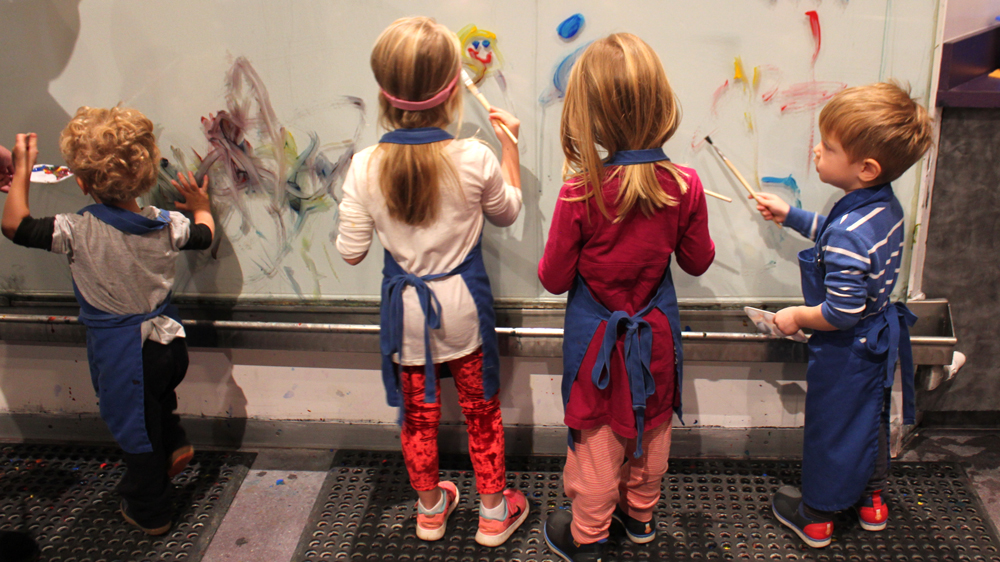
Our favorite children’s museum in Alamance County North Carolina first introduced us to painting on glass. We love it! 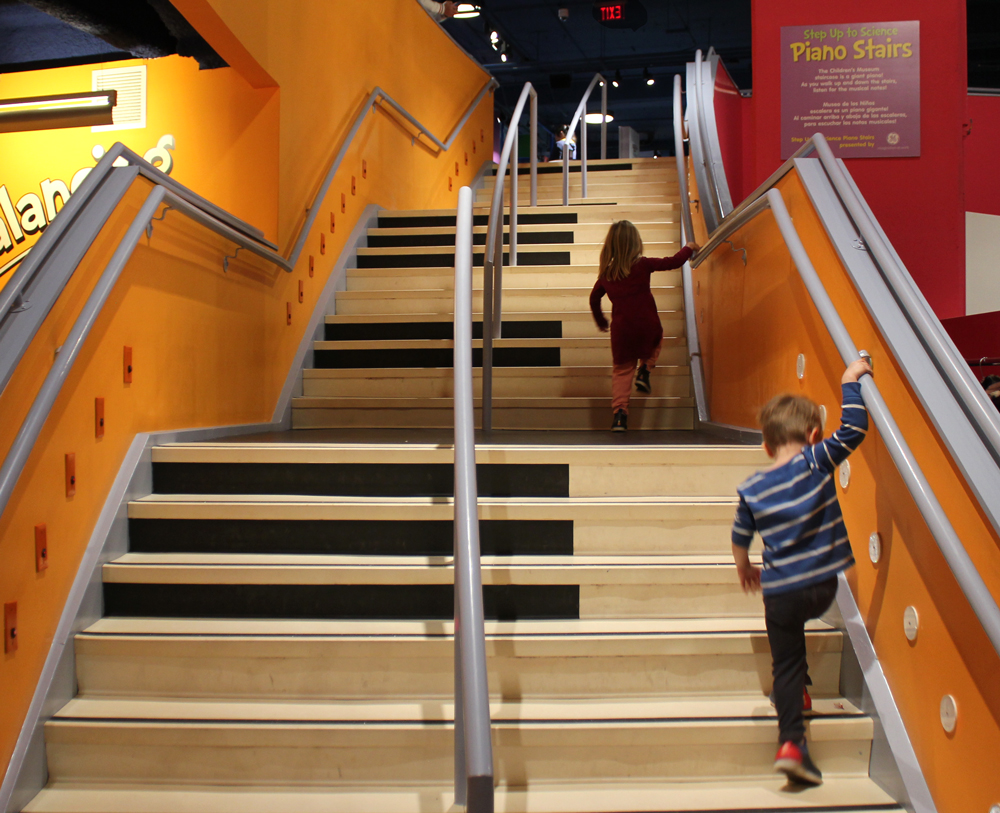
Piano stairs are always fun! I tried to explain to the kids how they worked, but they weren’t interested. 
They had nets and fishing poles for the kids. K managed to get his shirt soaking wet. 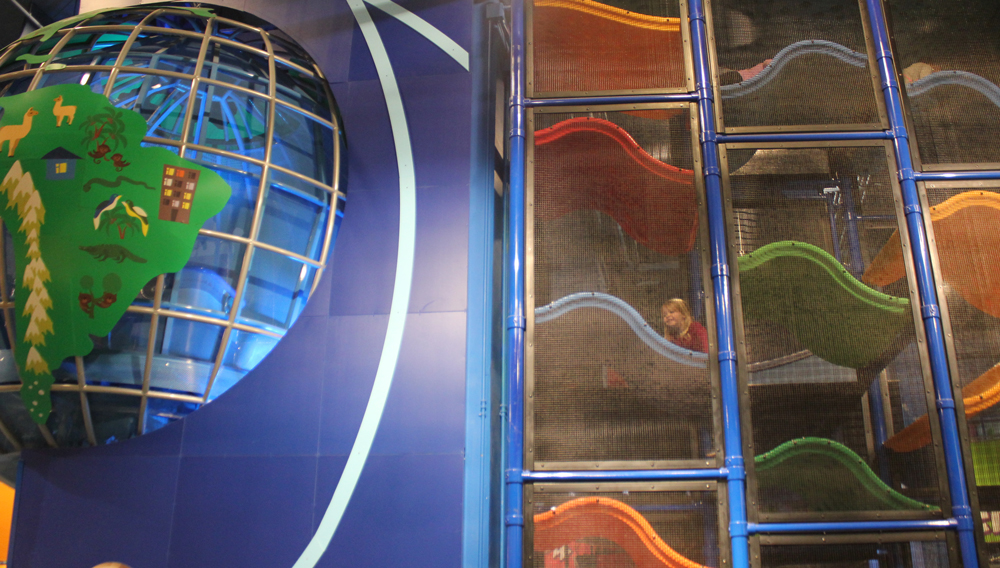
HJ and K both managed to climb all the way to the top and back without freaking out. Impressive considering how high this thing was! The place was quite clean and there were bags in each area to put toys that had been sucked on.

Hippos like to eat yucky toys! Overall, I found this to be a very fun children’s museum but nothing particularly out of the ordinary. Marbles in Raleigh is only $5 per person and has more to offer. But if you’re in the Atlanta area and need a place to entertain the kids, this will definitely do it!
-
Self Guided Walking Tour of Central London

When I was planning our whirlwind 2.5 days in London I knew there were a lot of sights we wanted to see but I didn’t want to do tours with the kids so jet lagged. Instead, I put together this route which covers Buckingham Palace, Trafalgar Square, Big Ben, and Parliament all within a 2-mile walk. If you want to see a lot in a short period of time, I definitely recommend walking this way and Google Maps makes it easy to steal our route!
To really get the most out of your route, read up on each of these historic spots before you go. If you are traveling in a group, assign each person a location to research and you can take turns playing tour guide!

Buckingham Palace. Time your visit to catch the changing of the guards, or not. We happened to stumble upon it and watched the guards parade by, but we didn’t try to jostle with the crowd for a view of the actual changing. 
Trafalgar Square. If you read Katie in London to your kids, this is a must visit. Even if you didn’t, it’s a very impressive square surrounded by wonderful architecture. As Americans, we were delighted and confused to find a statue of George Washington here. 
The view towards St. James Park from Trafalgar Square. 
The House of Lords If you have young children, reading about London in advance will make the trip a lot more fun!
-
Kid’s Water-Safety While Traveling

This post may contain affiliate links.
My daughter earned her first ribbon in swim class today! I was so proud of her as she jumped off the edge, turned to float on her back, and then swam to the edge all by herself! It really got me thinking about all the time I’ve spent worrying about water safety leading up to vacations. I tend to be particularly anxious about the kids around water and that is exasperated by the fact that I can’t swim very well! This touches on some of my deepest fears as a parent, so today I am sharing 4 ways you can keep your young children safe around water!
Swim lessons
This is #1 and can’t be overstated! Whether you pay for lessons or teach them yourselves, making sure your child is swim competent is the best life-long way to keep them safe in the water.
With very young children, consistency is the key to learning to swim. I recommend weekly year-round lessons if at all possible. If year-round is not available, aim for several times a week during the summer. Again, these don’t all have to be expensive private lessons! Give the kids some practice every time you’re staying at a hotel with a pool!

HJ was so proud of her swimming ribbon, even if you can’t tell from this picture! Full Attention
For many many years, this is what keeps your kids safe in the water. When I’m actually in the pool splashing around with the kids it’s not too hard, but it gets much more difficult when we are around water. Especially if you are watching multiple children, it’s hard to keep eyes on them every second of the day.
Last year my daughter ducked out a side exit from a restaurant in Miami. There were 10 adults all in her family all of whom had been playing with her and passing her around the entire breakfast, but no one keeping an eye on her at the critical moment. A stranger brought her back to us right at the moment we realized she was missing. I thank God that nothing happened to her! How much scarier would this have been if it happened somewhere with water around? Once a non-swimmer falls into a body of water there is only a very short period of time to fish them out.
One workaround I came up for was matching bracelets for adults and kids. Cheap silicon bracelets work great. Just slip a pink bracelet on the kid and also on an adult. If the adult needs a break they can communicate with another adult and pass them the bracelet. This way there is never any confusion over who is currently keeping an eye on the child. If you have multiple children just add another bracelet color to the equation. We also customized our bracelets to include my phone number in case the kids ever go missing in a crowd.

Chris playing with the kids on the beach in Hawaii. Even though they weren’t in the water I kept an eye on them so I could jump up and help Chris out if needed. Kid-Proof the Location
There are tools on the market to help safeguard during those moments when the kids escape your attention. They have bracelets that sound a loud alarm when they come in contact with water, sensors placed in the pool that alarm if they detect movement in the water, and portable fences to install around pools. Most of these products are aimed at pool-owners, but could also be taken on vacation under the right circumstances.
In any instance, these products should never be used instead of paying full attention. They are all intended as a back-up and are not a substitute for constant vigilance.
Although I’ve never purchased any of the above devices, I have come prepared to prevent my children from getting outside to the water. While staying at a lake house last year, I was concerned the children would wake up in the middle of the night and wander outside. We solved this problem quickly and cheaply by installing kid-proof doorknob handles in the room we all shared. Since I was paranoid I also brought door alarms that I quickly and easily installed in our bedroom. It all turned out to be unnecessary because the kids climbed into bed with us as soon as they work up, but the small cost was well worth the peace of mind.

For a friend’s wedding, we stayed at a lake house where the doors and windows opened out onto the deck and lake. I was very concerned about someone leaving a door open or my kids otherwise finding their way outside. Some cheap and easy child-proof door handles and door alarms were great for my peace of mind. Water-Proof the Kid
When we splash around in the ocean or even sometimes play on the beach, we make the kids wear puddle jumpers. We always stay within arms reach and would probably be fine without them, but they keep the kids safe and above water even if a sneaker wave comes and separates us. This style allows them to still play happily in the water or on the sand.
If we’re planning to be traveling frequently by boat, we often bring our own lifevests. Most tours will offer lifevests, but finding a good fit in an infant or toddler size can be tough. These definitely restrict their movement more than the puddle jumpers, but they are perfect for a child-overboard situation. They keep the kids floating with their head up and they have a convenient handle for grabbing.

Selfie on the way to Koh Lorn in Thailand. Our boat stopped on this platform to allow everyone a turn parasailing. You can tell K wasn’t super comfortable in his vest, but safety first! 
We were regularly taking water taxis and ferries in Bangkok. When we weren’t on the water we secured the kid’s lifevests to the baby carriers with cheap carabiners. Any other tips out there? Is this something that keeps anyone else awake at night?
amzn_assoc_placement = “adunit0”;
amzn_assoc_search_bar = “true”;
amzn_assoc_tracking_id = “magnetsfromev-20”;
amzn_assoc_ad_mode = “manual”;
amzn_assoc_ad_type = “smart”;
amzn_assoc_marketplace = “amazon”;
amzn_assoc_region = “US”;
amzn_assoc_title = “Shop This Post”;
amzn_assoc_linkid = “c39927d731568838b67e761556de2e01”;
amzn_assoc_asins = “B00HN94EEY,B014JOU8Z4,B00032CIJQ,B019CWBUS2”; -
Camping Essentials With Toddlers and Preschoolers
This post may contain affiliate links.
We’ve only been taking the kids camping for just over a year now, but we’ve already made 7 different trips as a family! So now that we’ve got some experience under our belt, I’m here to share my camping with toddlers checklist that has led to some of the most wonderful family bonding trips.
So what are my camping essentials with toddlers? Keep in mind my little campers are 2 and 4 now! 🙂

#1 First Aid Kit
Starting with the obvious here, primarily you will want band-aids and rubbing alcohol, but a ready-made kit is convenient too. Any cuts or scrapes that happen camping will need to be cleaned thoroughly and rubbing alcohol is an easy and quick way to do that. I also recommend keeping some small treats in with your first aid kit to help quiet the hysterical child. A bouncy ball is a fun thing to provide some distraction and cheap to replace.

#2 Easy to prepare meals
We don’t worry as much about the nutrient content of our camping meals as we do at home, but we just try to make sure we can get food on the table quickly and easily. Classic camping meals like hot dogs and s’mores are always on our menu! Oatmeal in the morning is super easy and cozy to make around the fire. You may want to have some appetizers available if the kids feel meal prep is taking too long and this might be a good time to present them with carrot sticks or celery.

Camping at Jordan Lake in NC. # 3 So many snacks
Many a time I’ve packed a snack and a lunch and we’ve set off on a hiking trail only to find that the kids have devoured everything by 10 am and are hungry again. Something about spending time outdoors gives them a nice hearty appetite and they burn through food. I recommend doubling the food you think you’ll need and bring food that takes longer to eat. Here’s what we pack these days:
- Cheese sticks
- Trail mix
- Apples and oranges
- Sandwiches
- Fruit snacks (the gummy kind)
- Baby carrots
- Veggie chips
- Tootsie roll pops (These are a treat for the kids and they take a long time to eat, plus the kids aren’t allowed to walk while they eat these so we can usually make some good ground hiking while they are sucking on these in the carriers. If you are at your campsite this is a good excuse to make the kids stop running around and sit for 20 minutes.)

# 4 Sand toys
When we first arrive and start setting up the tents, my kids immediately get to work digging holes and collecting rocks, sticks, etc. Little shovels and buckets make them happy and slightly, slightly, oh-so-slightly decrease how messy they get. I don’t let them bring other toys when we camp, but a bag of sand toys is usually enough to keep them happy!

Camping at Chimney Rock in NC. # 5 Waterproof shoes
You’re looking for something that can be worn with or without socks, snug enough for running and jumping, easily put on with little parental assistance, and will dry quickly when your kids inevitably jump in a puddle or wade in a stream. In our family right now both adults and kids wear Keen’s and the kids sometimes wear Plae. We like both brands.

Wading in the water is fun, waiting for your sneakers to dry is not! # 6 Travel potty
The worst part about camping is getting up in the middle of the night having to pee, climbing out of the tent, pulling your shoes on, trudging down the road to the restrooms, etc. This is even worse when it’s not your call of nature you’re responding to. So we set up our travel potty so little bottoms can sit in the middle of the night or when the need is especially urgent. The one we have has disposable bags but we’ve also found that gallon zip locks work as well. This is also clutch for road trips!

# 7 Towels
Even if you’re not planning to swim or shower, towels come in handy for sitting on wet picnic benches, drying after puddle jumping, toweling off slides if you come across a playground, using as extra blankets at night, etc. It doesn’t take too much space to toss a couple of them in the trunk, and you’ll always find a way to use them.

We weren’t camping, just taking a walk in Austin, TX, but any excuse is a good excuse to get wet! # 8 Lots of waters, individual bottles preferred
I know, I know, bottled water is super environmentally irresponsible, but it’s also super convenient. We can throw a couple bottles in before we go on a hike, keep some in the cooler, and keep a couple bottles inside the tents. It also decreases the risk that your entire water supply will be contaminated with rocks, sticks, and dirt when the kids make “soup”.

Even though a toddler carrier is one of my camping essentials with toddlers, they can still often convince Daddy to carry them on his shoulders. # 9 Lots of layers
There is no better time for that cute toddler hoody then as the sun is setting on a day of camping. For each kid, we bring a pair of shorts, a pair of tights, a pair of sweatpants, a t-shirt, a long-sleeved shirt, a hoody, and a jacket. Throughout the day what they have on fluctuates, but they usually wear everything at least once. The exception would be the jacket in the summertime, but even that could get used on a cool night.
This is especially important at night. If it’s going to be in the 50s or below we plan on stuffing them into their sleeping bags (rated for 20 degrees F) plus a blanket laid over top of them. Chris and I sleep in a different tent and always use sleeping bags rated 10 degrees higher than the kids. This was a happy accident but it gives us peace of mind knowing the kids are always a bit warmer than we are.

Big Basin State Park, CA # 10 Baby wipes
Even if you’re past the diaper stage (lucky!) these are still a lifesaver to have on hand. From wiping off dirty hands to cleaning off the spoon that just got dropped forthetenthtime, to cleaning faces after a lunch on the trail, these will be a must-have in our family for years to come.

Just look at his face, you know he’s about to make a big mess. # 11 Toddler carriers or backpacks
Personally, I am a big fan of forward motion when I hike, my kids not so much. So sometimes I just have to scoop them up and go. It’s good for my fitness level and it can be a nice time to cuddle; I wouldn’t even consider going camping without our Toddler Tulas these days.

My ultimate #1 camping essential with toddlers! In a pinch, I can even carry both kids in the carriers! Here we are at Morro Bay State Park. # 12 Waterproof picnic blanket
We keep ours in the car at all times and it always comes in handy. On our last camping trip, we were able to unfold it part way and drape across the entire picnic bench. This spared our towels and our bottoms from getting wet. We don’t hike with ours anymore because of the bulk, but we are quick to bring it out of the car at our campsite, when we stop at the beach or park, or if we need to change a diaper on the side of the road.

K was such a little baby! # 13 Flashlights for each kid
Flashlights are super fun and practical, and if they must be played with (they must) then it’s a lot easier when both kids have one and they can leave yours alone. That way when you need to go to the bathroom in the middle of the night or investigate strange noises, you can actually find what you’re looking for and the batteries haven’t been completely depleted.

Big Basin State Park 
amzn_assoc_placement = “adunit0”;
amzn_assoc_search_bar = “true”;
amzn_assoc_tracking_id = “magnetsfromev-20”;
amzn_assoc_ad_mode = “manual”;
amzn_assoc_ad_type = “smart”;
amzn_assoc_marketplace = “amazon”;
amzn_assoc_region = “US”;
amzn_assoc_title = “Going Camping?”;
amzn_assoc_linkid = “04d09da8c3850c4b583a154ba286e3d3”;
amzn_assoc_asins = “B000069EYA,B00DFMGX0G,B0018ZC7H0,B01AYGPYSC,B074TM1GNM,B00V639BX2,B00DDP3EGQ,B06VVP1N9D”; -
JetKids BedBox Review

This post may contain affiliate links.
My kids have had dozens of great flights. They’ve been well-behaved, they’ve slept, it’s been a dream. However, my children have also each had 1 really bad flight. For K, it was on the way to Bangkok and for HJ it was on the way back. Those were the longest flights we’ve ever taken and they were a nightmare. Since we have quite a few upcoming trips, including one to China, I decided to start looking for something, anything to help get the kids through those flights.
JetKids BedBox stood out to me as a fantastic idea. A suitcase the kids can ride on PLUS a comfy spot to prop their legs up on the airplane? Yes, please! Even though I loved the idea, I was a bit skeptical whether it would actually work.
*I was not compensated in any way for writing this review.*
Since the price was steep ($200) I decided to purchase one and test it out on our trip to Hawaii before deciding whether to splurge on a second one for London. Unfortunately, I spazzed out and ordered two (never double-click once you’ve entered your payment information!) so I changed my plan to only taking one to Hawaii and returning the second if it didn’t work out. I communicated the plan to the kids but not to Chris and they convinced him to open it while I was out. Oh well.
We’ve now used both of them on roundtrip flights to Hawaii and London.
The kids were really excited when the boxes arrived and they loved putting the stickers all over them. I think I’ll keep an eye out for location-specific stickers so the kids can continue decorating them as we travel.
Packing the JetKids BedBox
At first glance I was convinced that the BedBox was both too large (Surely it wasn’t going to fit under the seat in front of us?) and too small (What are we going to put in this? A toothbrush?). Happily, I was wrong on both accounts.
In each BedBox, I was able to pack a few books, a blanket, a small stuffed animal, a couple small toys, and some crayons or markers. It was the perfect size for in-flight entertainment to Hawaii, but it would be difficult to make work as their only luggage. We actually pulled it off going to London though! We packed 3 outfits tightly rolled in ziplock bags and it worked like a dream. I was able to fit everything except the carriers.

K’s BedBox. He was able to bring a small white-board with special crayons. You can see that I probably could have crammed an extra toy or two into the corners. 
HJ had a thicker blanket but we still managed to fit everything in. We could probably even have stuck a Barbie in the corner. 
The mattress takes up about half the space in the suitcase so if your child outgrows that feature, better to leave it at home. 
On our United flight to Hawaii (Boeing 777-200) the BedBox could fit under the seat in front of us in either of the orientations shown. Update 1/8/17: United no longer allows JetKids. I’m not sure when they made this rule or how strictly they enforce it but I came across this on their website today.

From United’s Website 
Plenty of room under the seat on Norwegian’s 787 Dreamliner non-stop from Oakland to London. Pulling and Carrying the JetKids BedBox
Neither of the children had any difficulties pulling the BedBox but they weren’t able to carry them due to the weight and the bulky shape. Chris and I could carry them using the shoulder/pulling strap, but it wouldn’t be my choice of luggage if we had to carry them long distances.

Waiting for a Lyft to take us to the airport so we could fly to London! While we travel we use mifold booster seats and they even fit inside the JetKids BedBoxes. 
K could pull his own suitcase with no problem! Riding the JetKids BedBox
This was absolutely my children’s favorite part of this product! They couldn’t wait to start riding as soon as we reached the airport. I was really impressed with how well the BedBox maneuvered through the airport. It had no problems turning on a dime, going over bumps, or riding on an uneven floor.
HJ (at the time only a couple days shy of 4-years-old) had no problem propelling herself through the airport. She wasn’t quite able to keep up with Chris and I if we walked at a normal pace, but she was close. K (at 2.5) was able to propel himself, but he was slow and preferred to be pulled. I was worried he might flip over backward if I pulled too fast, but he had a pretty good seat and had no trouble at all.
Here is K being pulled through the airport. The video isn’t the best because I was filming with the same hand I was pulling with.
HJ was determined to ride her BedBox the entire time we were in the airport, which included on the moving sidewalks. We let her so long as there weren’t too many people around.

Although there was a bit more noise, the BedBox still rolled smoothly over uneven airport floors. 
The BedBox could go over even large bumps like this, but only if you were already moving. It would catch if you went too slow. Stretching out on the JetKids BedBox Mattress
This was by far the most important part of the BedBox for us! It was also the part I was least confident would work as advertised.
When we first boarded the plane to Hawaii we realized that due to the seat configuration, there were only 3 under-seat areas in front of the 4 person row. Since we occupied the entire row this wasn’t a problem, but it might come up if you are supposed to share this space. The BedBox fit comfortably but didn’t leave space for anything else in that compartment.
On our trip to London, we found we could fit a pair of shoes or a thick sweater on top of the BedBox while it was stowed away.
We stowed the BedBoxes for take-off and landing but brought them out as soon as we were able. I had been worried that making the transition would be difficult, but it turned out to be really easy. We did have to get the kids up for a moment to get the mattress under them, but otherwise, we could do everything from our seats.

My little screen junkies with their legs propped up for comfort! Although the mattresses are quite thin, they really helped the kids get more comfortable. Before future trips, I might make a “connector piece” so they can have a smooth continuation between their two mattresses, instead of a small bumper. The bumpers didn’t add much to our experience because the kids mostly wanted to lounge across them onto one of us.

Having the option to prop that one leg up helped K get comfortable, but he still needed all of Mommy’s lap to sleep on! 
The kids getting comfy for the long overnight flight to London. 
The bumpers worked quite well as a stackable pillow! Even though the mattresses look pretty messy in this picture, they did the trick and the kids slept comfortably all night. 
Not the safest for sleeping, but K snuck into this position while Chris and I were snoozing. It certainly did look comfortable! Bonus Feature
The JetKids BedBox also makes a great leg rest in the airport! It’s the perfect size and height.

Even the grownups get to put their feet up on the BedBox sometimes! Final Thoughts on the JetKids BedBox
The kids absolutely love these things and the mattress capability really did add to their comfort on the airplane. For $200 a piece, I would only get one if you are going to fly a lot. If you just need it for one trip, maybe try borrowing one from a parent’s group? For us, I’m confident we’re going to get our money’s worth!
amzn_assoc_placement = “adunit0”;
amzn_assoc_search_bar = “true”;
amzn_assoc_tracking_id = “magnetsfromev-20”;
amzn_assoc_ad_mode = “manual”;
amzn_assoc_ad_type = “smart”;
amzn_assoc_marketplace = “amazon”;
amzn_assoc_region = “US”;
amzn_assoc_title = “More Kids Luggage to Ride”;
amzn_assoc_linkid = “c39eceeaa4ad91181553bb3d562cd534”;
amzn_assoc_asins = “B01DKJI9V4,B00RXW8CVC,B076PBKJPN,B06VVXJ9LY”; -
Milestone Hotel Afternoon Tea Review: Prince and Princess Tea
While we were in London this last week I was so excited to introduce HJ to afternoon tea. High tea has got to be one of my very favorite outings and London seemed like going straight to the source! After reading tons of resources on various ‘Prince and Princess Teas’ in London, we finally settled on The Milestone Hotel right near Kensington Palace. We decided to make this a girl’s trip since K is still a bit young to sit still for any length of time and the adult men just weren’t interested. That meant it was me, my mom, and my 4-year-old daughter.
The Milestone Hotel Afternoon Tea Review
The ability to easily make reservations online is important to me and The Milestone Hotel did not disappoint. Their system made it easy for us to verify the date was available and get instant confirmation. I meant to print out all my reservation confirmations before London, but I forgot about this one and it was no problem at all. We were “on the list” when we arrived.
Speaking of arriving, The Milestone Hotel was conveniently located right across from Kensington Palace Grounds. We hopped on a bus from Hyde Park Corner and it let us off just steps away from the entrance. The hotel itself was made up of two beautiful old buildings joined together. The architecture of the first third of the building face was slightly different than the rest of the face, but they went together quite well and it gave the hotel a lot of character.

The Milestone Hotel in London. We were welcomed to the hotel by a proper doorman in a top hat and ushered into to a small lobby very reminiscent of Victorian times. The living room/ tea room was right next to the lobby and was also small, cozy, and very Victorian. The walls were lined with books and painting and the windows were elaborately dressed.
Although the room was very beautifully decorated, it wasn’t so covered up in antiques that I was nervous about bringing my 4-year-old kid. I would say the balance between beautiful and practical was just right.

HJ told us “This is my first tea outside the house!” What a big girl she is getting to be! We had a cozy table for 3 by a window and the waitress was right with us to take drink orders. HJ ordered a pink lemonade but they didn’t have it. Instead, the waitress offered her a milkshake which she happily accepted. There were dozens of teas to choose from, including an “Unusual and Exciting” category.
We ordered the ‘Royal Afternoon Tea for 2’ and the ‘Prince and Princess Tea’. The Royal Tea came with half a bottle of Champagne and we started on that while we were still deciding on tea. HJ’s milkshake came out so quickly she didn’t even have time to fidget.

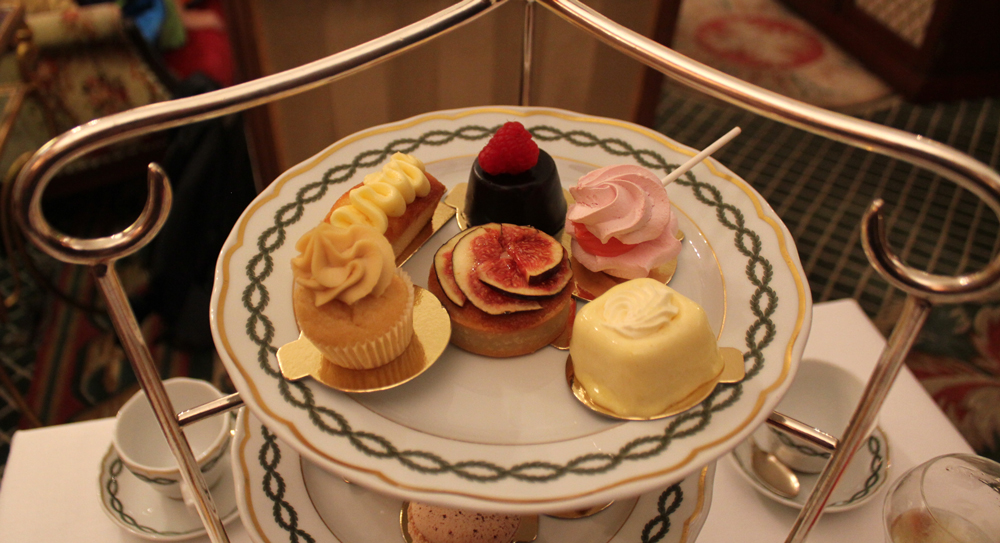
She almost looked delirious as she sampled her milkshake! The ‘Prince and Princess’ platter for HJ quickly followed the milkshake and was loaded with yummy treats! The two-layer platter included 3 different sandwiches, a fresh scone with strawberry preserves and clotted cream, and 5 beautiful little desserts. HJ was immediately drawn to the butterfly cookie (or biscuit in the UK) but enjoyed taking her time and sampling all the desserts (she didn’t touch the sandwiches, but insisted she should save them for her brother.)

All this for one little girl? Our platters came out at the same time and were filled with scrumptious treats! There were 5 different kinds of sandwiches and a ton of beautiful little desserts. The house specialty is the chicken salad sandwich rolled in peanuts, it was delicious!

The savory sandwiches and the first level of desserts. We each had our own sandwiches to sample and even though the desserts were tiny, we were able to split them in two so we could both sample each item. It worked out perfectly and we were still able to fill 2 to-go boxes with treats for our men-folk. Each item was delicious, but nothing really left an impression on me other than their signature chicken salad sandwich. I need to try to make those at home!
We took our time sampling the different treats and talking. It was exactly the kind of relaxed experience we had hoped for. HJ was very well behaved and preoccupied inspecting all the various treats and just when she started to lose interest and wanted to wander around, a waitress appeared and asked her if she would like to decorate a cupcake. I hadn’t seen this on the menu, so it was a very pleasant surprise.
I was hoping for a polite “Yes, please” but instead the waitress got an enthusiastic, “Sure!” She escorted HJ into the next room where she presented her with an apron, a cupcake, and several candy toppings. The waitress helped her frost the top and then HJ got to sprinkle the candies on herself.
My Mom and I put our heads in just long enough to take a couple pictures and then we returned to a few blissful child-free moments. Nothing beats a restaurant where they’ll take care of your kid! Even if it is just for a few minutes!
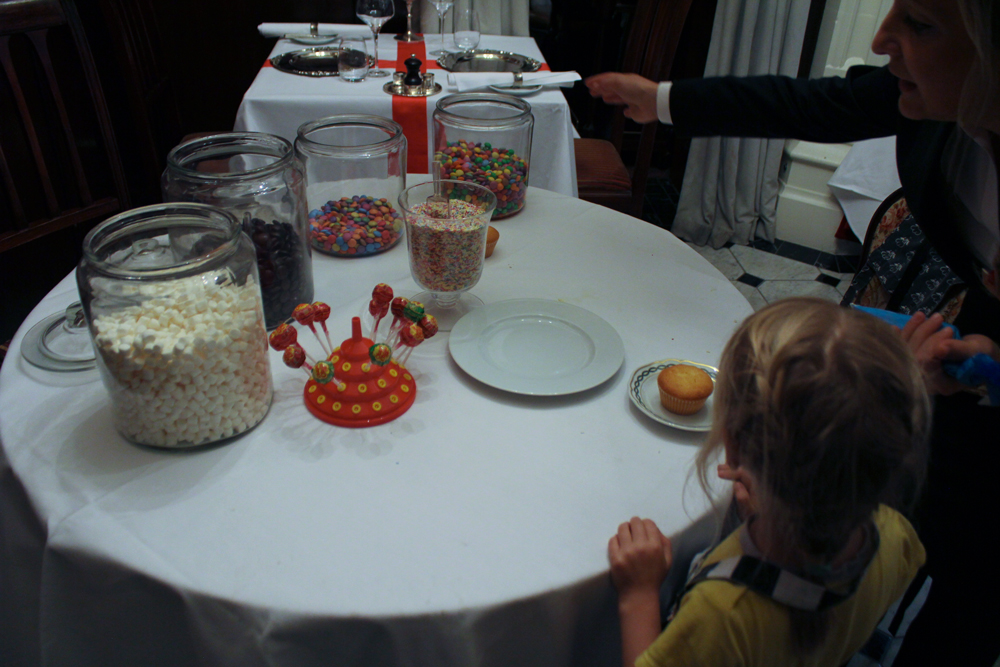
All that candy! 
HJ was very particular about her color scheme! When HJ returned with her cupcake, she was so full she couldn’t even eat the whole thing! She did make sure to lick the icing off the top though!

You might not know it from the fake smile, but she was very proud of her cupcake! Overall it was a great experience and I would love to go again! We took our time, relaxed, and never felt rushed by the staff. We were dressed quite casually since we were mid-way through a full day of sightseeing, but we still felt quite comfortable. If you are considering the Milestone Hotel’s Afternoon Tea for a special occasion, dressing up a bit would be appropriate as well!
If you are on the fence about taking a young child to high tea, just do it! HJ loved acting grown up and being served like a little Princess. If you are considering where to go, I hope you’ll consider the Milestone Hotel, we really loved it!
PS- The Milestone Hotel also offers Vegetarian and Gluten-Free Afternoon Tea options!
amzn_assoc_placement = “adunit0”;
amzn_assoc_search_bar = “true”;
amzn_assoc_tracking_id = “magnetsfromev-20”;
amzn_assoc_ad_mode = “manual”;
amzn_assoc_ad_type = “smart”;
amzn_assoc_marketplace = “amazon”;
amzn_assoc_region = “US”;
amzn_assoc_title = “Preparing for Tea?”;
amzn_assoc_linkid = “bf4d9fdb4a24d3d8f132d52af13d38c2”;
amzn_assoc_asins = “B01C7NHVW2,B001RTSTJW,B072MFP1V8,B01K91NXOO”;//z-na.amazon-adsystem.com/widgets/onejs?MarketPlace=US

-
Tower of London with Kids

This post may contain affiliate links.
The last time I was in London I was 15 and the Tower of London was my favorite. This trip we only had 2 days of sightseeing, but I knew the tower of London needed to be at the top of my list.
So here is how we went about visiting the Tower of London with kids and what we found out about living at the Tower of London with kids! Be sure to check out my post on how to Teach Kids About London Before Visiting. Giving some context to young kids can really increase their enthusiasm for a visit!

The kids loved visiting the Tower of London! HJ was over the moon to see a real castle and real crowns. I purchased tickets online less than a week in advance. When you go to purchase tickets you are required to select a date (but not a time) and the website says the tickets will be valid for 7 days past that date. When you receive the printable ticket it will only display the selected date and won’t say anything about a 7 day grace period. Don’t worry, that data is stored in the barcode.
Our plan was to be in line at 10 am Sunday right as the Tower was opening. The line already contained 100+ people and there were more people in line to purchase tickets. The entrance line went quickly, but I definitely recommend purchasing tickets in advance to avoid additional queues.
As you enter or stand in line, you’ll pass metal mesh statues of lions in a pit. These animal statues, part of the Royal Beasts exhibit, are scattered throughout the fortress and pay tribute to the many exotic animals held at the Tower for over 600 years.

These lions are ready to greet you when you arrive at the Tower of London. 
The view of the Tower of London from the entrance queue. Immediately inside the gate, there are opportunities to purchase adult or child guidebooks for £5 each. A short walk further there are opportunities to rent audioguides. When you book tickets online you have the option of including these, but if you choose not to at the time of booking, there are still opportunities to grab them at the last minute.
The Tower of London is not particularly tall, compared to the modern London skyline, but it is still a formidable fortress. We chose to go straight to the Crown Jewels before the crowds arrived. The children were excited to see the Beefeaters standing guard outside the Jewel House and K loved to watch them march back and forth.

The Jewel Tower where the Crown Jewels are kept. Although the castle maintains it’s historic integrity, there are now metal doors that can be closed to turn the tower into a vault. 
K showing us how he can stand guard like a Beefeater. The Jewel House included several rooms of history and background before the rooms of scepters, coronation spoons, and crowns. The crowns themselves are displayed next to a moving sidewalk, to ensure no one lingers too long and the line can keep moving. HJ loved the crowns and had a hard time picking a favorite, but purple crowns with multi-colored jewels seemed to be her favorite.
Although most of the jewels are on display at any given time, there were some signs indicating that certain objects were in-use. A reminder that the modern monarchy, while stripped of most power, still commands a lot of wealth in Britain.
Upon exiting the Jewel House, we found some more statues from the Royal Beasts collection: Monkeys! Of all the animal displays, I found these the creepiest and most “Wizard of Oz”.
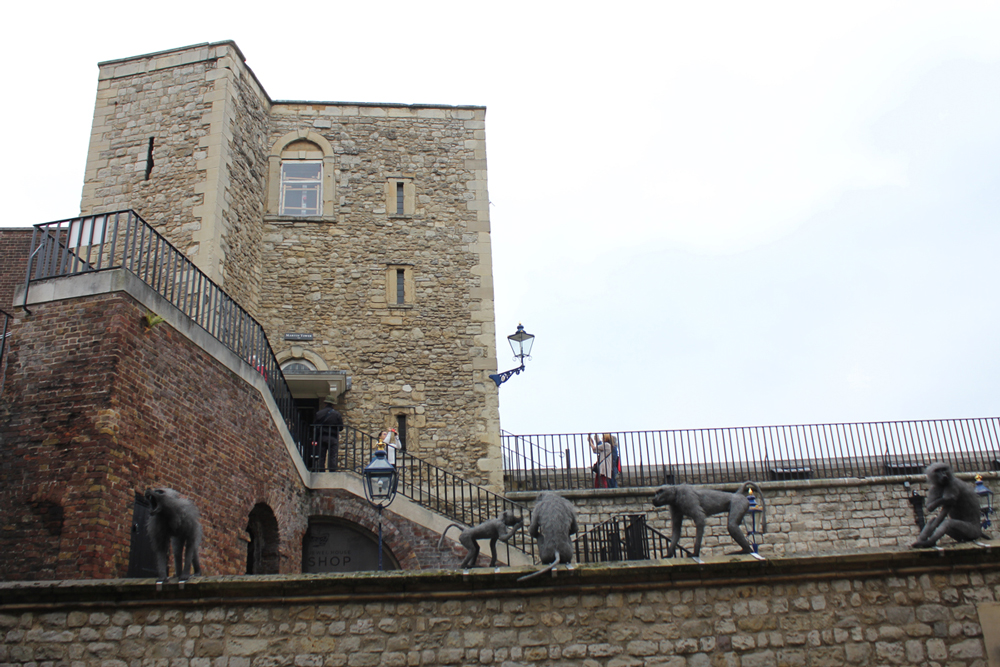
I was a little concerned that they might attack! Next up, we explored the White Tower. This is the actual “tower” in the “Tower of London” but it still looks more like a castle than a tower. The White Tower includes a life-sized collection of horses and armor of past English Kings, including a *ahem* rather endowed armor of King Henry VIII. I even found some armor for very small children. It appeared to have been made for appearances rather than actual battle because the smallest was only up to my knee.
There were even children born and raised here. High born prisoners like Sir Walter Raleigh were allowed to have family and servants with them!
St. John’s Chapel was a particularly beautiful room filled with arches. While we were there, certain areas were roped off to be used as part of a movie set!
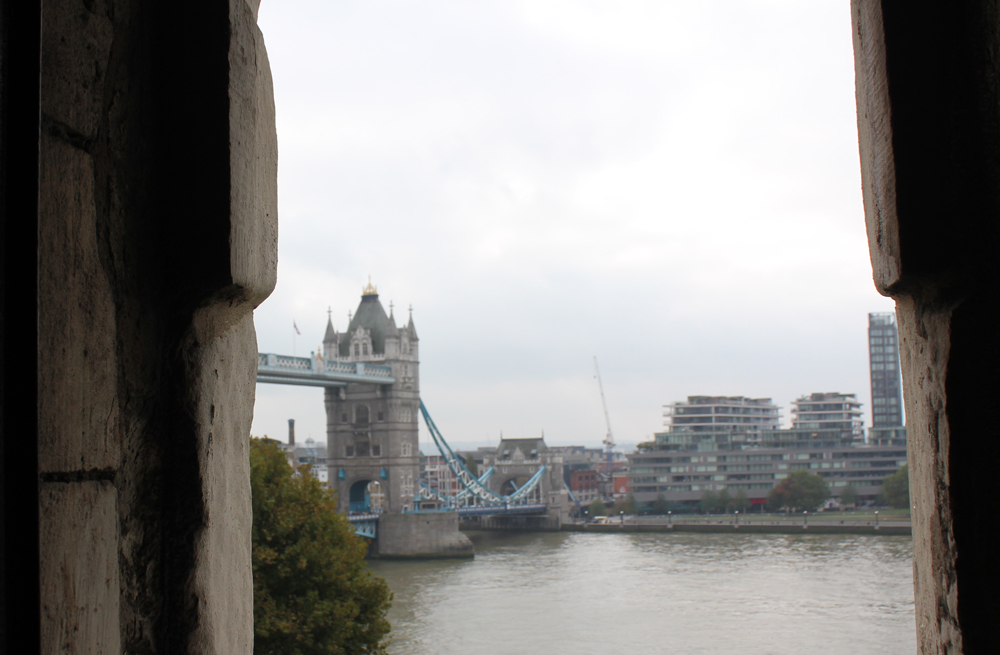
The view from a window of the Tower of London looking toward Tower Bridge. Next, we headed to check out the torture chambers. I choose to walk through quickly with the kids and not offer any explanations. At their age (4 and 2) they didn’t notice or ask about anything so I was able to avoid those conversations.
Before we entered the torture chambers, we ran into one of the guided tour groups and stopped for a quick listen. The Beefeater guide was very animated and filled with interesting trivia about the Tower. He was talking about the Tower ravens and how the old legend insists that if they ever leave the Tower will fall. To bar against that possible calamity, Charles II decreed that 6 ravens should be kept at all times.

These birds are huge! This one had a tag on his leg, but isn’t part of the 6 since he was roaming free and not in a cage. 
The Beefeaters tour looked fantastic but very crowded. With kids, we decided to skip this and do a self-guided tour from the guidebook. The last thing we did was climb the Tower Walls and walk along the perimeter. This involved a lot of stairs and families with strollers had to leave them outside. We alternated walking along the wall or walking through small tower rooms with lots of stairs. If it had been raining this could have been quite unpleasant and tricky with kids.
From the Tower Walls, we were able to watch one of the historical reenactments taking place in the yard. You could hear the actors from the Wall so it was an almost perfect place to watch the show. The only problem was one of the actors kept getting blocked by a tree which drove my daughter crazy.

This would be a good choice with kids. The crowds weren’t too bad and HJ loved watching from the wall. The last thing I found particularly interesting along the wall was the apartments of the Yeoman Warders. Approximately 150 people still live in the Tower of London, including the Beefeater and their families. I imagine there are some drawbacks of living inside a guarded fortress, but it also has to be really cool!

It actually is possible to live at the Tower of London with kids! In order to be a Yeoman Warder, you have to serve at least 22 years in the armed services. So plan your family accordingly! Overall I’d call this a very successful visit. The weather was good and only a bit foggy, the crowds were manageable (Sunday at opening), and we kept a good pace to keep the kids engaged. I definitely recommend purchasing tickets in advance and bringing the baby carrier.
If you do happen to visit in the rain, I recommend bringing a poncho with front buttons that you can put around the baby carrier or separate ones for the kids. The Tower Walls have a lot of stairs to navigate and you’ll want to keep your hands free and visibility clear if you’re navigating with children.
Oh, and when you’re all done? There’s a small playground right across the street at the Tower Hill Garden. Give those kids a few minutes to play!

The Tower Hill Garden Playground right across the street from the Tower of London. Perfect for kids! amzn_assoc_placement = “adunit0”;
amzn_assoc_search_bar = “true”;
amzn_assoc_tracking_id = “magnetsfromev-20”;
amzn_assoc_ad_mode = “manual”;
amzn_assoc_ad_type = “smart”;
amzn_assoc_marketplace = “amazon”;
amzn_assoc_region = “US”;
amzn_assoc_title = “My Amazon Picks”;
amzn_assoc_linkid = “fa9f31bc7cab4cb3066cf1000ae1ab9b”;
amzn_assoc_asins = “B000FE3A9O,B07458S5PW,B00RUF2CP4,1760342289”;


Magnets From Everywhere
Dreaming, planning, inspiring family travel. Starting here, starting now.
